My email address: zrg1390556486@gmail.com
1. 一、简单入门
1.1. 启动器
<parent>
  <groupId>org.springframework.boot</groupId>
  <artifactId>spring-boot-starter-parent</artifactId>
  <version>2.4.1</version>
  <relativePath/> <!-- lookup parent from repository -->
</parent>
说明:spring-boot-starter,帮助导入了web模块正常运行所依赖的组件。Spring boot 将所有的功能场景都抽象出来,做成一个个starters(启动器),只需要在项目里面引入这些starter相关场景,依赖都会导入。
1.2. 主程序类
主程序类
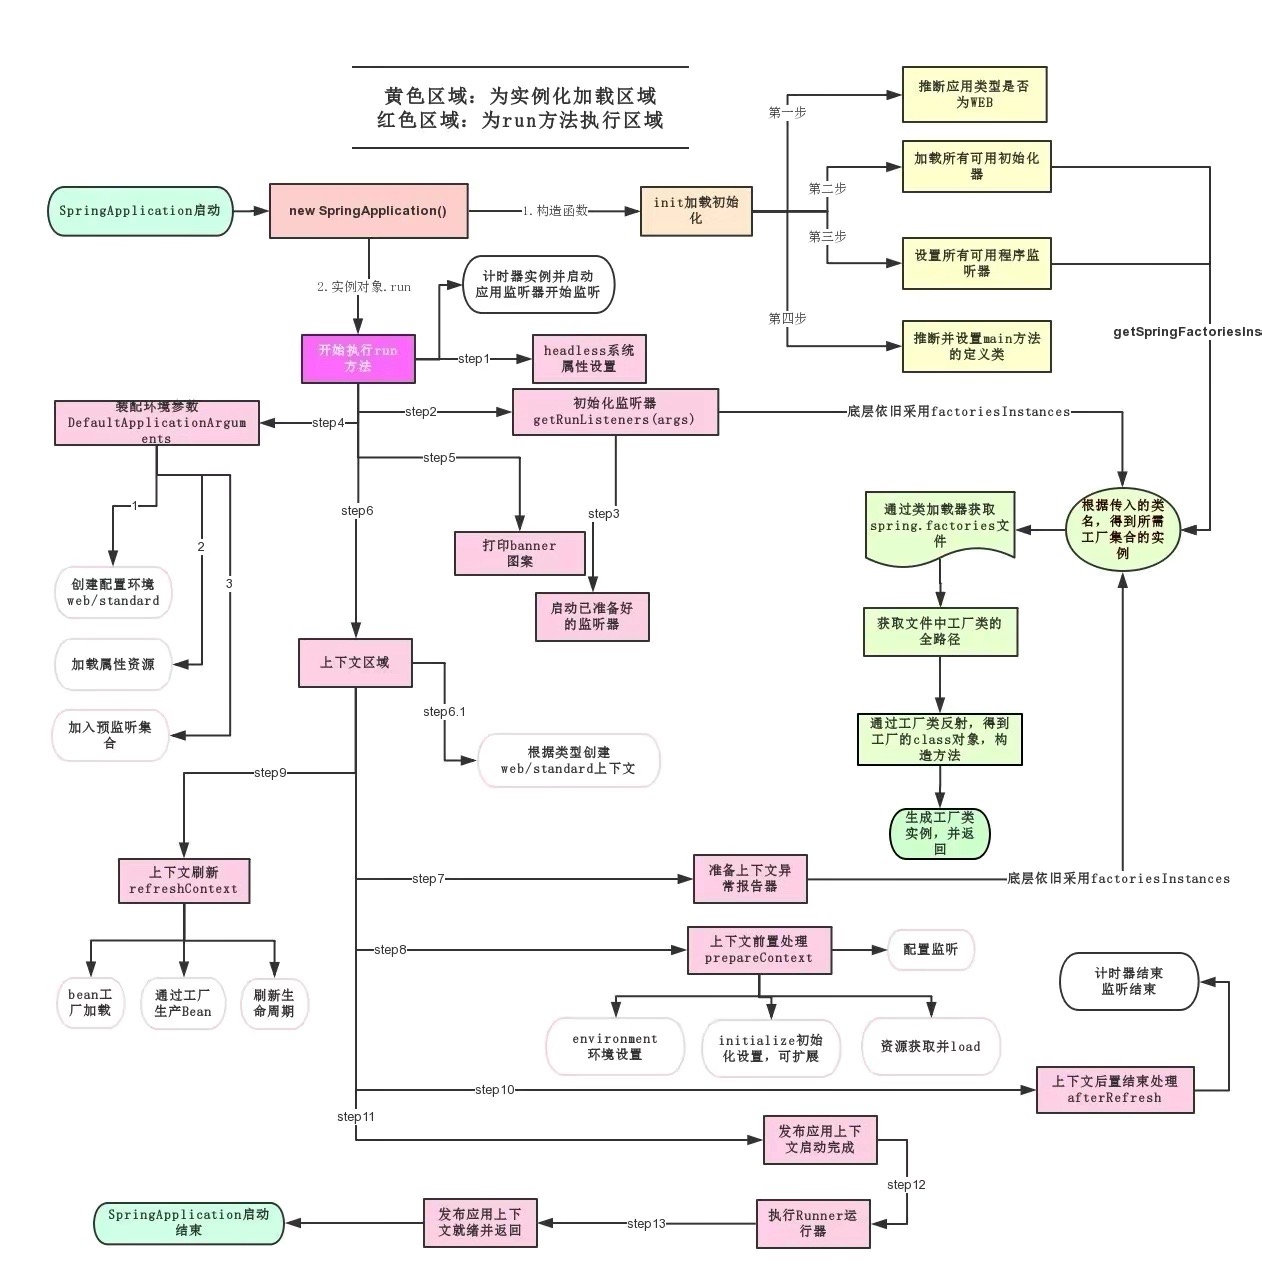
@SpringBootApplication
public class WebDemoApplication {
    public static void main(String[] args) {
        SpringApplication.run(WebDemoApplication.class, args);
    }
}
@SpringBootApplication @SpringBootApplication标注在哪个类上说明这个类是SpringBoot的主配置类,SpringBoot就运行这个类的main方法启动应用。转到定义查看:
@Target({ElementType.TYPE})
@Retention(RetentionPolicy.RUNTIME)
@Documented
@Inherited
@SpringBootConfiguration // SpringBoot的配置类
@EnableAutoConfiguration // 开启自动配置功能
@ComponentScan(excludeFilters = {
        @Filter(type = FilterType.CUSTOM, classes = {TypeExcludeFilter.class}),
        @Filter(type = FilterType.CUSTOM,classes = {AutoConfigurationExcludeFilter.class})})
public @interface SpringBootApplication {
- @SpringBootConfiguration
- @Configuration,配置类上来标注这个注解
- @Component,配置类也是容器中的一个组件
@EnableAutoConfiguration
// @EnableAutoConfiguration 转到定义:
@AutoConfigurationPackage // 自动配置包
@Import({AutoConfigurationImportSelector.class})
public @interface EnableAutoConfiguration {
}

// @AutoConfigurationPackage 转到定义:
@Import({Registrar.class}) // 给容器中导入一个组件;导入的组件由Registrar.class;
public @interface AutoConfigurationPackage {
}

// @Import({AutoConfigurationImportSelector.class}) 转到定义:
public class EnableAutoConfigurationImportSelector // 导入哪些组件的选择器
- EnableAutoConfigurationImportSelector,表示导入哪些组件的选择器;
- 将所有需要导入的组件以全类名的方式返回;这些组件就会被添加到容器中;
- SpringBoot 在启动的时候从类路径下的META-IINF/spring.factories中获取EnableAutoConfiguration指定的值,将这些值作为自动配置类导入到容器中。以前我们需要自己配置。
1.3. 问题:Plugin 'org.springframework.boot:spring-boot-maven-plugin:' not found
解决:添加<version>2.4.1</version>,版本号与启动器版本一致。
<build>
    <plugins>
    <plugin>
    <groupId>org.springframework.boot</groupId>
    <artifactId>spring-boot-maven-plugin</artifactId>
    <version>2.4.1</version>
    </plugin>
    </plugins>
    </build>
2. 二、Spring boot配置
2.1. 配置文件:修改自动配置的默认值
SpringBoot 使用两种格式的配置:
- application.properties
- application.yml
2.2. 获取yml配置文件内容的方式
YAML(YAML Ain’t Markup Language)以数据为中心,比json、xml等更适合做配置文件。注意last-name和lastName是一样的。
@ConfigurationProperties
@ConfigurationProperties(prefix = “person”)
public class xxx {

}
@value
@value(“${person.last-name}”)

@value(“11*2”)
应用场景:如果在某个业务逻辑中获取一下配置值,使用@value;专门编写了一个javaBean来和配置文件进行映射,那么就使用@ConfigurationProperties
- @PropertySource(value = {“”class path:person.properties})加载指定的配置文件
- @ImportResource导入spring的配置文件
注意:SpringBoot推荐给容器中添加组件的方式:使用全注解的方式。
配置文件占位符:
随机数:${random.value}, ${random.int}
占位符之前配置的值,没有可以用:指定默认值。${person.hello:hello}_dog
2.3. @Configuration
/*
 *@Configuration: 指明当前类是一个配置类,代替之前的spring配置文件
 */
@Configuration
public class HelloConfig {
    @Bean
    public HelloService helloService(){
        System.out.println("配置类@Bean添加组件");
        return new HelloService();
    }
}
2.4. 多环境配置
多profile方式
Application-{profile}.properties/yml,默认使用application.properties
application-dev.properties
application-test.properties
application-prod.properties
Yml支持多文档块方式:使用三横线分隔
server:
port: 8081
# 不写下面三行,默认是8081
spring:
profiles:
active: prod
---
server:
port: 8082
spring:
config:
activate:
on-profile: test
---
server:
port: 8083
spring:
config:
activate:
on-profile: prod
- 激活指定profile
- 在配置文件中指定:spring.profiles.active=dev
- 命令行$ jar -jar xxx.jar —spring.profiles.active=dev
- 虚拟机选项: -Dspring.profiles.active=dev
2.5. 配置文件的加载
2.6. 外部配置的加载顺序
SpringBoot 除了可以从项目中的 application.properties/application.yml 主配置文件中加载配置,还可以从以下位置加载配置: 1、命令行参数:所有的配置都可以在命令行参数中指定,每个配置项前使用–,多个配置间使用空格隔开,例如:
java -jar XXX.jar --server.port=8088 --server.context-path=boot
2、来自 java:comp/env 的 JNDI 属性 3、java的系统属性(System.getProperties("")) 4、操作系统环境变量 5、RandomValuePropertySource 配置的 random.* 属性值 6、jar 包外部的 application-{profile}.properties 或 application-{profile}.yml(带spring.profile配置) 7、jar 包内部的 application-{profile}.properties 或 application-{profile}.yml(带spring.profile配置) 8、jar 包外部的 application.properties 或 application.yml(不带spring.profile配置) 9、jar 包内部的 application.properties 或 application.yml(不带spring.profile配置) 10、@Configuration 注解类上的 @PropertySource 11、通过 SpringApplication.setDefaultProperties() 指定的默认属性
2.7. 自动配置加载原理
- Springboot 启动的时候加载主配置类,开启自动配置功能 @EnableAutoConfiguration
@EnableAutoConfiguration 作用:
- 利用EnableAutoConfigurationImportSelector给容器中导入组件
- 可以查看selectImports方法的内容
获取候选的配置
List<String> configurations = this.getCandidateConfigurations(annotationMetadata, attributes);
SpringFactoriesLoader.loadFactoryNames()
扫描所有 jar 包类路径下 META-INF/spring.factories
把扫描到的这些文件的内容包装成 properties 对象
从properties 中获取到 EnableAutoConfiguration.class 类(类名)对应的值,然后把他们添加在容器中
org.springframework.boot.autoconfigure.version.jar包中,**将类路径下 META-INF/spring.factories 里面配置的所有 EnableAutoConfiguration 的值加入到了容器中。** 每一个这样的 xxxAutoConfiguration类都是容器中的一个组件,都加入到容器中;用他们来做自动配置。
- 每一个自动配置类进行自动配置功能;
以**HttpEncodingAutoConfiguration(Http编码自动配置)**为例解释自动配置原理;
//表示这是一个配置类,以前编写的配置文件一样,也可以给容器中添加组件
@Configuration(proxyBeanMethods = false)

//启动指定类的ConfigurationProperties功能;将配置文件中对应的值和HttpEncodingProperties绑定起来;
//并把HttpEncodingProperties加入到ioc容器中
@EnableConfigurationProperties({ServerProperties.class})

//Spring底层@Conditional注解(Spring注解版),根据不同的条件,如果满足指定的条件,
//整个配置类里面的配置就会生效;判断当前应用是否是web应用,如果是,当前配置类生效
@ConditionalOnWebApplication(type = Type.SERVLET)
//判断当前项目有没有这个类CharacterEncodingFilter;SpringMVC中进行乱码解决的过滤器;
@ConditionalOnClass({CharacterEncodingFilter.class})

//判断配置文件中是否存在某个配置spring.http.encoding.enabled;如果不存在,判断也是成立的
//即使我们配置文件中不配置pring.http.encoding.enabled=true,也是默认生效的;
@ConditionalOnProperty(
                       prefix = "server.servlet.encoding",
                       value = {"enabled"},
                       matchIfMissing = true
                       )

public class HttpEncodingAutoConfiguration {
    //他已经和SpringBoot的配置文件映射了
    private final Encoding properties;

    //只有一个有参构造器的情况下,参数的值就会从容器中拿
    public HttpEncodingAutoConfiguration(ServerProperties properties) {
        this.properties = properties.getServlet().getEncoding();
    }

    @Bean //给容器中添加一个组件,这个组件的某些值需要从properties中获取
    @ConditionalOnMissingBean //判断容器没有这个组件?
    public CharacterEncodingFilter characterEncodingFilter() {
        CharacterEncodingFilter filter = new OrderedCharacterEncodingFilter();
        filter.setEncoding(this.properties.getCharset().name());
        filter.setForceRequestEncoding(this.properties.shouldForce(org.springframework.boot.web.servlet.server.Encoding.Type.REQUEST));
        filter.setForceResponseEncoding(this.properties.shouldForce(org.springframework.boot.web.servlet.server.Encoding.Type.RESPONSE));
        return filter;
    }

    @Bean
    public HttpEncodingAutoConfiguration.LocaleCharsetMappingsCustomizer localeCharsetMappingsCustomizer() {
        return new HttpEncodingAutoConfiguration.LocaleCharsetMappingsCustomizer(this.properties);
    }

    static class LocaleCharsetMappingsCustomizer implements WebServerFactoryCustomizer<ConfigurableServletWebServerFactory>, Ordered {
        private final Encoding properties;

        LocaleCharsetMappingsCustomizer(Encoding properties) {
            this.properties = properties;
        }

        public void customize(ConfigurableServletWebServerFactory factory) {
            if (this.properties.getMapping() != null) {
                factory.setLocaleCharsetMappings(this.properties.getMapping());
            }

        }

        public int getOrder() {
            return 0;
        }
    }
}
根据当前不同的条件判断,决定这个配置类是否生效。一但这个配置类生效;这个配置类就会给容器中添加各种组件;这些组件的属性是从对应的properties类中获取的,这些类里面的每一个属性又是和配置文件绑定的。
总结: 所有在配置文件中能配置的属性都是在 xxxxProperties 类中封装着,配置文件能配置什么就可以参照某个功能对应的这个属性类(能配置的属性都是来源于这个功能的 properties 类)。
精髓:
- SpringBoot启动会加载大量的自动配置类
- 我们看我们需要的功能有没有SpringBoot默认写好的自动配置类;
- 我们再来看这个自动配置类中到底配置了哪些组件;(只要我们要用的组件有,我们就不需要再来配置了)
- 给容器中自动配置类添加组件的时候,会从properties类中获取某些属性。我们就可以在配置文件中指定这些属性的值;
- Springboot 加载原理图:
2.8. @Conditional & 自动配置报告
@Conditional派生注解
作用:必须是@Conditional指定的条件成立,才给容器中添加组件,配置配里面的所有内容才生效。
@Conditional扩展注解        作用(判断是否满足当前指定条件)
@ConditionalOnJava      系统的java版本是否符合要求
@ConditionalOnBean      容器中存在指定Bean;
@ConditionalOnMissingBean       容器中不存在指定Bean;
@ConditionalOnExpression        满足SpEL表达式指定
@ConditionalOnClass     系统中有指定的类
@ConditionalOnMissingClass      系统中没有指定的类
@ConditionalOnSingleCandidate   容器中只有一个指定的Bean,或者这个Bean是首选Bean
@ConditionalOnProperty  系统中指定的属性是否有指定的值
@ConditionalOnResource  类路径下是否存在指定资源文件
@ConditionalOnWebApplication    当前是web环境
@ConditionalOnNotWebApplication 当前不是web环境
@ConditionalOnJndi      JNDI存在指定项
怎么知道哪些自动配置类生效?
可以通过 application.properties 启用 debug=true 属性;来让控制台打印自动配置报告。
- Positive matches:(自动配置类启用的)
- Negative matches:(没有启动,没有匹配成功的自动配置类)
3. 三、日志
3.1. 日志框架
市面上的日志框架:JUL、JCL、Jboss-logging、logback、log4j、log4j2、slf4j…
- 日志门面(抽象):JCL(Jakarta Commons Logging),slf4j(Simple Login Facade for java), Jboss-logging…
- 日志实现:JUL, logback, log4j, log4j2
SpringBoot:底层是Spring框架,Spring框架默认是用JCL; SpringBoot 选用 SLF4j和logback;
3.2. slf4j使用原理
如何在系统中使用SLF4j?https://wwwlslf4j.org 开发的时候,日志记录方法的调用,不应该来直接调用日志的实现类,而是调用日志抽象层里面的方法。 给系统里面导入 slf4j 的 jar 和 logback 的实现 jar:
import org.slf4j.Logger;
import org.slf4j.LoggerFactory;

public class WebDemoApplication {
    public static void main(String[] args) {
        Logger logger = LoggerFactory.getLogger(WebDemoApplication.class);
        logger.info("Hello wolrd!");
        SpringApplication.run(WebDemoApplication.class, args);
    }
}
蓝颜色的是:实现 浅蓝色的是:适配层,因为早期没有考虑到 注意:每一个日志的实现框架都有自己的配置文件。使用slf4j以后,配置文件还是做成日志实现框架自己本身的配置文件。
遗留问题 假设a系统依赖框架,但是框架底层有自己的日志,而且各不相同(slf4j+logback): Spring(commons-logging)、Hibernate(jboss-logging)、MyBatis、xxxx 解决办法:统一日志记录,使用slf4j进行输出。在slf4j 网站上https://www.slf4j.org/ 有一个legacy APIs. https://www.slf4j.org/legacy.html ,如下图:
 )
)
如何让系统中所有的日志都统一到slf4j? 由于底层Spring、Hibernate的日志实现与springboot不一样,所以springboot使用了**替换机制**(将系统中其他日志框架先排除出去;用中间包来替换原有的日志框架;导入SLF4j的实现)。
3.3. 分析日志关系
打开pom.xml,右键,Diagrams,show dependencies
 )
)
- SpringBoot底层也是使用slf4j+logback的方式进行日志记录
- SpringBoot也把其他的日志都替换成了slf4j
中间替换包
@SuppressWarnings("rawtypes")
public abstract class LogFactory {
    static String UNSUPPORTED_OPERATION_IN_JCL_OVER_SLF4J = "http://www.slf4j.org/codes.html#unsupported_operation_in_jcl_over_slf4j";

    static LogFactory logFactory = new SLF4JLogFactory();
 )
)
结论:springboot能自动适配所有的日志,而且底层是 SLF4j+Logback 的方式进行日志记录,引入其他框架,一定要把这个框架的默认日志依赖移除掉。
<dependency>
  <groupId>org.springframework</groupId>
  <artifactId>spring-core</artifactId>
  <exclusions>
    <exclusion>
      <groupId>commons-logging</groupId>
      <artifactId>commons-logging</artifactId>
    </exclusion>
  </exclusions>
</dependency>
3.4. 默认配置
SpringBoot默认帮我们配置好了日志:
@SpringBootTest
class WebDemoApplicationTests {
    //记录器
    Logger logger = LoggerFactory.getLogger(getClass());

    @Test
    void contextLoads() {
        //日志的级别;
        //由低到高   trace<debug<info<warn<error
        //可以调整输出的日志级别;日志就只会在这个级别以以后的高级别生效
        logger.trace("这是trace日志...");
        logger.debug("这是debug日志...");
        //SpringBoot默认给我们使用的是info级别的,没有指定级别的就用SpringBoot默认规定的级别;root级别
        logger.info("这是info日志...");
        logger.warn("这是warn日志...");
        logger.error("这是error日志...");
    }
}
日志输出格式:
%d表示日期时间,
%thread表示线程名,
%-5level:级别从左显示5个字符宽度
%logger{50} 表示logger名字最长50个字符,否则按照句点分割。
%msg:日志消息,
%n是换行

%D{yyyy-MM-dd HH:mm:ss.SSS} [%thread] %-5level %logger{50} - %msg%n
SpringBoot修改日志的默认配置
logging.level.com.atguigu=trace
#logging.path=
# 不指定路径在当前项目下生成springboot.log日志
# 可以指定完整的路径;
#logging.file=G:/springboot.log

# 在当前磁盘的根路径下创建spring文件夹和里面的log文件夹;使用 spring.log 作为默认文件
logging.path=/spring/log

#  在控制台输出的日志的格式
logging.pattern.console=%d{yyyy-MM-dd} [%thread] %-5level %logger{50} - %msg%n
# 指定文件中日志输出的格式
logging.pattern.file=%d{yyyy-MM-dd} === [%thread] === %-5level === %logger{50} ==== %msg%n
3.5. 指定日志文件和日志Profile功能
给类路径下放上每个日志框架自己的配置文件即可;SpringBoot 就不使用他默认配置的了,下面是对应的命名和放置:
- Logback:logback-spring.xml, logback-spring.groovy, logback.xml or logback.groovy
- Log4j2:log4j2-spring.xml or log4j2.xml
JDK (Java Util Logging):logging.properties logback.xml:直接就被日志框架识别了 logback-spring.xml:日志框架就不直接加载日志的配置项,由 SpringBoot 解析日志配置,可以使用 SpringBoot 的高级 Profile 功能:
<appender name="stdout" class="ch.qos.logback.core.ConsoleAppender">
    <layout class="ch.qos.logback.classic.PatternLayout">
    <springProfile name="dev">
    <pattern>%d{yyyy-MM-dd HH:mm:ss.SSS} ----> [%thread] ---> %-5level %logger{50} - %msg%n</pattern>
        </springProfile>
        <springProfile name="!dev">
        <pattern>%d{yyyy-MM-dd HH:mm:ss.SSS} ==== [%thread] ==== %-5level %logger{50} - %msg%n</pattern>
            </springProfile>
            </layout>
            </appender>
注意:如果使用 logback.xml 作为日志配置文件,还要使用 profile 功能,会有以下错误:
no applicable action for [springProfile]
3.6. 切换日志框架
可以按照 slf4j 的日志关系图,进行相关的切换。示例:slf4j+log4j 切换为 log4j2:
slf4j+log4j
<dependency>
  <groupId>org.springframework.boot</groupId>
  <artifactId>spring-boot-starter-web</artifactId>
  <exclusions>
    <exclusion>
      <artifactId>logback-classic</artifactId>
      <groupId>ch.qos.logback</groupId>
    </exclusion>
    <exclusion>
      <artifactId>log4j-over-slf4j</artifactId>
      <groupId>org.slf4j</groupId>
    </exclusion>
  </exclusions>
</dependency>

<dependency>
  <groupId>org.slf4j</groupId>
  <artifactId>slf4j-log4j12</artifactId>
</dependency>
log4j
<dependency>
  <groupId>org.springframework.boot</groupId>
  <artifactId>spring-boot-starter-web</artifactId>
  <exclusions>
    <exclusion>
      <artifactId>spring-boot-starter-logging</artifactId>
      <groupId>org.springframework.boot</groupId>
    </exclusion>
  </exclusions>
</dependency>

<dependency>
  <groupId>org.springframework.boot</groupId>
  <artifactId>spring-boot-starter-log4j2</artifactId>
</dependency>
4. 四、SpringBoot与Web开发
4.1. 静态资源映射规则
所有 webjars/*,都去 classpath:/META-INF/resources/webjars/ 下找资源。 webjars,以jar包的方式引入静态资源,官网:https://www.webjars.org/
eg:localhost:8080/webjars/jquery/3.3.1/jquery.js
访问当前项目内的资源
"classpath:/META-INF/resources/"
"classpath:/resources/"
"classpath:/static/"
"classpath:/public/"
- 欢迎页:静态资源目录下的所有 index.html 页面
所有的 /favicon.ico 都是在静态资源文件下找
可配置:spring.web.resources.static-locations=classpath:/hello,classpath:/assets
4.2. 模版引擎
JSP, Velocity, Thymeleaf, [Mustache](https://mustache.github.io/), [FreeMarker](https://freemarker.apache.org/docs/), [Groovy](https://docs.groovy-lang.org/docs/next/html/documentation/template-engines.html#_the_markuptemplateengine)
Thymeleaf用法:
- 直接将html文件放在templates目录下,就能自动渲染。
然后官网查看详细用法:https://www.thymeleaf.org/
<html lang="en" xmlns:th="http://www.thymeleaf.org">
语法规则
<p th:text="${hello}"></p>
5. 五、Spring MVC
5.1. Spring MVC auto-configuration原理
Spring Boot 自动配置好了 SpringMVC,以下是 SpringBoot 对 SpringMVC 的默认配置:**WebMvcAutoConfiguration**
- Inclusion of `ContentNegotiatingViewResolver` and `BeanNameViewResolver` beans.
- 自动配置了ViewResolver(视图解析器:根据方法的返回值得到视图对象(View),视图对象决定如何渲染(转发?重定向?))
- ContentNegotiatingViewResolver:组合所有的视图解析器的;
- 如何定制:我们可以自己给容器中添加一个视图解析器;自动的将其组合进来;
- Support for serving static resources, including support for WebJars (see below).静态资源文件夹路径,webjars
- Static `index.html` support. 静态首页访问
- Custom `Favicon` support (see below). favicon.ico
- 自动注册了 of `Converter`, `GenericConverter`, `Formatter` beans.
- Converter:转换器; public String hello(User user):类型转换使用Converter
- `Formatter` 格式化器; 2017.12.17===Date;自己添加的格式化器转换器,我们只需要放在容器中即可
- Support for `HttpMessageConverters` (see below).
- HttpMessageConverter:SpringMVC用来转换Http请求和响应的;User—Json;
- `HttpMessageConverters` 是从容器中确定;获取所有的HttpMessageConverter;自己给容器中添加HttpMessageConverter,只需要将自己的组件注册容器中(@Bean,@Component)
- Automatic registration of `MessageCodesResolver` (see below).定义错误代码生成规则
Automatic use of a `ConfigurableWebBindingInitializer` bean (see below). 我们可以配置一个ConfigurableWebBindingInitializer来替换默认的;(添加到容器)
[org.springframework.boot.autoconfigure.web](http://org.springframework.boot.autoconfigure.web/):**web的所有自动场景**
If you want to keep Spring Boot MVC features, and you just want to add additional [MVC configuration](https://docs.spring.io/spring/docs/4.3.14.RELEASE/spring-framework-reference/htmlsingle#mvc) (interceptors, formatters, view controllers etc.) you can add your own `@Configuration` class of type `WebMvcConfigurerAdapter`, but without `@EnableWebMvc`. If you wish to provide custom instances of `RequestMappingHandlerMapping`, `RequestMappingHandlerAdapter` or `ExceptionHandlerExceptionResolver` you can declare a `WebMvcRegistrationsAdapter` instance providing such components.
If you want to take complete control of Spring MVC, you can add your own `@Configuration` annotated with `@EnableWebMvc`.
5.2. 扩展与全面接管SpringMVC
扩展SpringMVC 原先在spring-mvc.xml中这样的:
<mvc:view-controller path="/hello" view-name="success"/>
<mvc:interceptors>
  <mvc:interceptor>
    <mvc:mapping path="/hello"/>
    <bean />
  </mvc:interceptor>
</mvc:interceptors>
现在,SpringBoot 可以编写一个配置类(@Configuration),是 WebMvcConfigurerAdapter 类型;不能标注 @EnableWebMvc。这样既保留了所有的自动配置,也能用我们扩展的配置。
// 在 Spring Boot 2.0 之后 WebMvcConfigurerAdapter 就已经过时了,并且 WebMvcConfigurer 接口也发生了变化,里面所有的方法都定义成了默认方法(default)。
// 因此我们可以直接实现 WebMvcConfigurer 接口,重写对应的方法即可。
@Configuration
public class MvcConfig implements WebMvcConfigurer {
    @Override
    public void addViewControllers(ViewControllerRegistry registry) {
        // super.addViewControllers(registry);
        //浏览器发送 /atguigu 请求来到 success
        registry.addViewController("/success").setViewName("index");
    }
}
原理:
- WebMvcAutoConfiguration是SpringMVC的自动配置类,在做其他自动配置时会导入:@Import(EnableWebMvcConfiguration.class)
- 容器中所有的WebMvcConfigurer都会一起起作用
- 自定义的配置类也会被调用
全面接管 SpringMVC SpringBoot 对 SpringMVC 的自动配置不需要了,所有都是我们自己配置,所有的 SpringMVC 的自动配置都失效了。(但是实际开发中,不推荐全面接管,除非写很小的应用,因为大部分功能都会用到)
**方法**:在配置类中添加 @EnableWebMvc 即可。在springboot中,有非常多的xxxx Configuration 帮助我们进行扩展配置,只要看见了这个东西,我们就要注意了!因为它可能改变了 Spring 原有的东西。 **注意**:当我们使用 @EnableWebMvc,则静态资源无法访问。
为什么添加@EnableWebMvc后,SpringBoot 自动配置就失效了?
@EnableWebMvc的核心
@Import({DelegatingWebMvcConfiguration.class})
public @interface EnableWebMvc {
DelegatingWebMvcConfiguration
@Configuration(
               proxyBeanMethods = false
               )
public class DelegatingWebMvcConfiguration extends WebMvcConfigurationSupport {
WebMvcAutoConfiguration
@Configuration(
               proxyBeanMethods = false
               )
@ConditionalOnWebApplication(
                             type = Type.SERVLET
                             )
@ConditionalOnClass({Servlet.class, DispatcherServlet.class, WebMvcConfigurer.class})
// 注意:容器中没有这个组件的时候,这个自动配置类才生效
@ConditionalOnMissingBean({WebMvcConfigurationSupport.class})
@AutoConfigureOrder(-2147483638)
@AutoConfigureAfter({DispatcherServletAutoConfiguration.class, TaskExecutionAutoConfiguration.class, ValidationAutoConfiguration.class})
public class WebMvcAutoConfiguration {
- @EnableWebMvc将WebMvcConfigurationSupport组件导入进来
- 导入的WebMvcConfigurationSupport只是SpringMVC最基本的功能;
5.3. 引入资源
@Override
public void addResourceHandlers(ResourceHandlerRegistry registry){
    registry.addResourceHandlers("/static/**").addResourceLocations("classpath:/static/");
}
5.4. 国际化
- 编写国际化配置文件
- 使用ResourceBundleMessageSource管理国际化资源文件
- 在页面使用fmt:message取出国际化内容
步骤:
编写国际化配置文件,抽取页面需要显示的国际化消息
signin.properties
signin_en_US.properties
signin_zh_CN.properties
SpringBoot自动配置好了管理国际化资源文件的组件
@Configuration(
               proxyBeanMethods = false
               )
@ConditionalOnMissingBean(
                          name = {"messageSource"},
                          search = SearchStrategy.CURRENT
                          )
@AutoConfigureOrder(-2147483648)
@Conditional({MessageSourceAutoConfiguration.ResourceBundleCondition.class})
@EnableConfigurationProperties
public class MessageSourceAutoConfiguration {
    private static final Resource[] NO_RESOURCES = new Resource[0];

    public MessageSourceAutoConfiguration() {
    }

    @Bean
    @ConfigurationProperties(
                             prefix = "spring.messages"
                             )
    public MessageSourceProperties messageSourceProperties() {
        return new MessageSourceProperties();
    }

    @Bean
    public MessageSource messageSource(MessageSourceProperties properties) {
        ResourceBundleMessageSource messageSource = new ResourceBundleMessageSource();
        if (StringUtils.hasText(properties.getBasename())) {
            //设置国际化资源文件的基础名(去掉语言国家代码的)
            messageSource.setBasenames(StringUtils.commaDelimitedListToStringArray(StringUtils.trimAllWhitespace(properties.getBasename())));
        }

        if (properties.getEncoding() != null) {
            messageSource.setDefaultEncoding(properties.getEncoding().name());
        }

        messageSource.setFallbackToSystemLocale(properties.isFallbackToSystemLocale());
        Duration cacheDuration = properties.getCacheDuration();
        if (cacheDuration != null) {
            messageSource.setCacheMillis(cacheDuration.toMillis());
        }

        messageSource.setAlwaysUseMessageFormat(properties.isAlwaysUseMessageFormat());
        messageSource.setUseCodeAsDefaultMessage(properties.isUseCodeAsDefaultMessage());
        return messageSource;
    }
去页面获取国际化的值
<!DOCTYPE html>
<html lang="en" xmlns:th="http://www.thymeleaf.org">
  <head>
    <title>Signin Template · Bootstrap v5.0</title>
  </head>
  <body class="text-center">

    <main class="form-signin">
      <form>
        <img class="mb-4" src="/assets/img/svg/bootstrap-logo.svg" alt="" width="72" height="57">
        <h1 class="h3 mb-3 fw-normal" th:text="#{signin.tip}">Please sign in</h1>
        <label for="inputEmail" class="visually-hidden" th:text="#{signin.email}">Email address</label>
        <input type="email" id="inputEmail" class="form-control" placeholder="Email address"
               th:placeholder="#{signin.email}" required="" autofocus="">
        <label for="inputPassword" class="visually-hidden" th:text="#{signin.password}">Password</label>
        <input type="password" id="inputPassword" class="form-control" placeholder="Password"
               th:placeholder="#{signin.password}" required="">
        <div class="checkbox mb-3">
          <label>
            <input type="checkbox" value="remember-me"> [[#{signin.remeber}]]
          </label>
        </div>
        <button class="w-100 btn btn-lg btn-primary" type="submit" th:text="#{signin.btn}">Sign in</button>
        <p class="mt-5 mb-3 text-muted">© 2017-2020</p>
      </form>
    </main>

  </body>
</html>
效果:根据浏览器语言设置的信息切换了国际化。
**原理**:国际化Locale(区域信息对象);LocaleResolver(获取区域信息对象);
// WebMvcAutoConfiguration.class
@Bean
@ConditionalOnMissingBean(
                          name = {"localeResolver"}
                          )
public LocaleResolver localeResolver() {
    if (this.webProperties.getLocaleResolver() == org.springframework.boot.autoconfigure.web.WebProperties.LocaleResolver.FIXED) {
        return new FixedLocaleResolver(this.webProperties.getLocale());
    } else if (this.mvcProperties.getLocaleResolver() == org.springframework.boot.autoconfigure.web.servlet.WebMvcProperties.LocaleResolver.FIXED) {
        return new FixedLocaleResolver(this.mvcProperties.getLocale());
    } else {
        AcceptHeaderLocaleResolver localeResolver = new AcceptHeaderLocaleResolver();
        Locale locale = this.webProperties.getLocale() != null ? this.webProperties.getLocale() : this.mvcProperties.getLocale();
        localeResolver.setDefaultLocale(locale);
        return localeResolver;
    }
}
5.5. 登录
登陆错误消息的显示
@Controller
public class LoginController {
    @RequestMapping(value = "/user/login", method = RequestMethod.POST)
    public String login(@RequestParam("username") String username,
                        @RequestParam("password") String password,
                        Map<String,Object> map) {
        if (!StringUtils.isEmpty(username) && "123456".equals(password)) {
            // 登录成功,防止表单重复提交,重定向到首页
            httpSession.setAttribute("user", username);
            return "redirect:/main.html";
        } else {
            map.put("msg","用户名或密码错误");
            return "signin";
        }
    }
}
<p style="color: red" th:text="${msg}" th:if="${not #strings.isEmpty(msg)}"></p>
注册拦截器
@Bean
public WebMvcConfigurer webMvcConfigurer() {
    return new WebMvcConfigurer() {
        @Override
        public void addViewControllers(ViewControllerRegistry registry) {
            registry.addViewController("/").setViewName("signin");
            registry.addViewController("/index.html").setViewName("signin"); // 登录页
            registry.addViewController("/main.html").setViewName("dashboard"); // 首页
        }

        // 注册拦截器
        @Override
        public void addInterceptors(InterceptorRegistry registry) {
            // springboot已经做好了静态资源映射
            registry.addInterceptor(new LoginHandlerInterceptor()).addPathPatterns("/**").excludePathPatterns("/index.html", "/", "/user/login");
        }
    };
}
5.6. CRUD
5.7. 使用Spring Data JPA、Hikari连接池操作MySQL数据库
- pom中引入spring-boot-starter-data-jpa依赖,以及MySQL连接类mysql-connector-java依赖。
- springboot 2.0 后默认连接池就是Hikari了,所以引用parents后不用专门加依赖。
- 为了减少实体类或虚拟实体类的代码,引入**lombok**依赖。Lombok能以简单的注解形式来简化java代码,提高开发人员的开发效率。Lombok参考:https://www.jianshu.com/p/2ea9ff98f7d6
5.8. 配置数据源连接
5.9. RESTful API:CRUD
5.10. Data JPA在进行方法名解析时,会先把方法名多余的前缀截取掉,比如 find、findBy、read、readBy、get、getBy,然后对剩下部分进行解析。
5.11. @Query自定义查询语句
在声明的方法上面标注@Query注解,即可通过写SQL实现自定义查询语句。正式生产编程中,除非迫不得已,否则不建议使用此方式进行数据查询或持久化操作。建议多用面向对象的思路进行编程,涉及多表关联等太过复杂的查询可以在业务层拼装数据。使用SQL,首先SQL维护起来不方便,其次而且如果大量使用了某个数据库的原生SQL将会造成系统与某一数据库绑定,无法更换数据库,各家数据库部分语法还是略有差异的。
原生查询
@Query(value = "SELECT * FROM STUDENT WHERE GENDER = :gender",nativeQuery = true)
public List<Student> findAllByGender(@Param("gender") String gender);

-- 其中使用@Param("gender")注入参数,nativeQuery = true代表使用当前数据库原生SQL语句。各家数据库部分语法还是略有差异,在非特殊情况下,不建议大量使用,如果大量使用,换数据库时会很痛苦,甚至整套系统只能使用某一品牌数据库。
@Query(value = "SELECT * FROM STUDENT WHERE GENDER = ?1 AND NAME like %?2%",nativeQuery = true)
public List<Student> findAllByGender( String gender,String namelk);
HQL查询
HQL学习可参考[Hibernate 之强大的HQL查询](https://www.cnblogs.com/quchengfeng/p/4111749.html)
5.12. RESTful API
我们项目封了 Data REST,又封了 Data JPA,其实最后执行持久化到数据库里,是基于Hibernate的。当我们的json或者其他格式的数据转换成这个需要持久化的对象时,没有的属性转换时自然就为空值,保存到数据库里的也就为空值。 所以做更新时,后台给前台对象的哪些属性,调用RESTful更新接口时,前台也要给后台返回全部字段,这样不管如何增减字段,都由后台控制,前端只需返回原样的数据模型即可。后端人员在编写接口说明时,一定要特别注意这个细节,否则处理不当可能会发生生产事故。
还有另外一种方法就是后台接收到更新请求后,通过主键反查出此对象(findById),通过反射直接赋值。此种方式需重写更新方法不说,还牺牲了后台的效率,并不推荐。
小结:Spring Data REST都可快速帮我们实现了HAL数据风格的RESTful API接口。HAL概念请参考:[分布式架构设计之Rest API HAL](https://blog.csdn.net/why_2012_gogo/article/details/77195387)。换句话来说,Spring Data REST帮我们写了service层和controller层的代码。
5.13. 基于spring data jpa封装带有动态分页查询、动态条件求和的基础service类和基础controller类
5.14. @Transactional配置参数详解
5.14.1. 1、 rollbackFor:配置何种异常回滚
在@Transactional注解中如果不配置rollbackFor属性,那么只会在遇到RuntimeException的时候才会回滚,加上rollbackFor=Exception.class,可以让事务在遇到非运行时异常时也回滚。一般在日常生产开发中,我们配置成rollbackFor=Exception.class
5.14.2. 2、readOnly:读写事务控制
readOnly=true表明所注解的方法或类只是读取数据,我们的某个方法只提供查询时,可以进行此种配置。readOnly=false表明所注解的方法或类是增加,删除,修改数据。默认是false,一般使用默认即可,无需配置。
5.14.3. 3、Propagation事务传播行为
*开发人员不得进行此项配置,只能与项目负责人申请评估后方可进行配置
Propagation属性用来枚举事务的传播行为。所谓事务传播行为就是多个事务方法相互调用时,事务如何在这些方法间传播。Spring支持7种事务传播行为,默认为REQUIRED。
、REQUIRED
REQUIRED是常用的事务传播行为,如果当前没有事务,就新建一个事务,如果已经存在一个事务中,加入到这个事务中。
我们使用sping data jpa时,它的实现类的方法就是使用了此项默认配置,所以我们操作各表时,事务能绑定到同一个,异常时全部回滚。
2、SUPPORTS
SUPPORTS表示当前方法不需要事务上下文,但是如果存在当前事务的话,那么这个方法会在这个事务中运行。
3、MANDATORY
MANDATORY表示该方法必须在事务中运行,如果当前事务不存在,则会抛出一个异常。不会主动开启一个事务。
4、REQUIRES_NEW
REQUIRES_NEW表示当前方法必须运行在它自己的事务中。一个新的事务将被启动,如果存在当前事务,在该方法执行期间,当前事务会被挂起(如果一个事务已经存在,则先将这个存在的事务挂起)。如果使用JTATransactionManager的话,则需要访问TransactionManager。
5、NOT_SUPPORTED
NOT_SUPPORTED表示该方法不应该运行在事务中,如果存在当前事务,在该方法运行期间,当前事务将被挂起。如果使用JTATransactionManager的话,则需要访问TransactionManager。
6、NEVER
NEVER表示当前方法不应该运行在事务上下文中,如果当前正有一个事务在运行,则会抛出异常。
7、NESTED
NESTED表示如果当前已经存在一个事务,那么该方法将会在嵌套事务中运行。嵌套的事务可以独立于当前事务进行单独地提交或回滚。如果当前事务不存在,那么其行为与REQUIRED一样。嵌套事务一个非常重要的概念就是内层事务依赖于外层事务。外层事务失败时,会回滚内层事务所做的动作。而内层事务操作失败并不会引起外层事务的回滚。
5.14.4. 4、isolation:事务隔离级别 [详见数据库篇]
*开发人员不得进行此项配置,只能与项目负责人申请评估后方可进行配置
5.15. Spring Boot整合knife4j(swagger-bootstrap-ui)实现自动API文档
6. 六、微服务
7. 七、Spring Cloud Eureka
Spring Cloud Eureka是Spring Cloud Netflix服务套件中的一部分,它基于Netflix Eureka做了二次封装,主要负责完成微服务架构中的服务治理功能。
Eureka包含了服务器端和客户端组件。服务器端,也被称作是服务注册中心,用于提供服务的注册与发现。
Eureka支持高可用的配置,当集群中有分片出现故障时,Eureka就会转入自动保护模式,它允许分片故障期间继续提供服务的发现和注册,当故障分片恢复正常时,集群中其他分片会把他们的状态再次同步回来。
客户端组件包含服务消费者与服务生产者。在应用程序运行时,Eureka客户端向注册中心注册自身提供的服务并周期性的发送心跳来更新它的服务租约。同时也可以从服务端查询当前注册的服务信息并把他们缓存到本地并周期性的刷新服务状态。
 )
)
@RestController:相当于@Controller和@ResponseBody的组合